1. CICD 파이프라인을 어떻게 구축하고 있을까?
몇 기업들의 빌드/배포
자동화 파이프라인 구축에 대해서 알아보았고, 그 중 가장 자세하고, 도움이 되었던 글은
하루에 1000번 배포하는 조직 되기 | 뱅크샐러드
이다.
파이프라인 재구축 전 상황과 pain point, 그래서 어떻게 변경했는지, 현재 어떤 식으로 운영되고 있는지가 자세히 설명되어져 있었기 때문이다.
예전에는 아래와 같은 AWS의 서비스를 사용하여
-
-

- CodeBuild: 소스 코드를 컴파일하는 단계에서부터 테스트 후 배포까지의 단계를 지원하는 CI 서비스.
- Github과의 연결을 통해 빌드를 시작할 수 있으며 Codepipeline과 연결하여 커밋이 발생할 때마다 자동으로 빌드를 수행할 수 있음.
- 코드에 대한 빌드와 테스트
- 또한 사전 구성된 빌드 환경을 제공하여 ECR을 관리하기 위해 런타임과 도구를 패키징하여 자신만의 빌드 환경을 구성
- 빌드에 관련된 정보를 AWS CloudWatch Log로 저장
- CodeDeploy: EC2, ECS와 같은 다양한 컴퓨팅 서비스에 대해 소프트웨어 배포를 자동화하여 제공하는 완전 관리형 CD(Continuous Deploy) 서비스.
- 자동화된 확장성
- CodePipeline: 릴리즈 파이프라인 자동화를 위한 CD(Continuous Delivery) 서비스.
- 커스텀 워크플로우 구현 가능
- CodeBuild: 소스 코드를 컴파일하는 단계에서부터 테스트 후 배포까지의 단계를 지원하는 CI 서비스.
-
이러한 파이프라인을 구축하여 배포 자동화를 연습해보았다.
이 방식은 AWS console에서 클릭 몇 번으로 파이프라인을 구축할 수 있고, Cloudwatch에서 배포 현황을 한데 모아서 모니터링 할 수 있다는 점에서 매우 편리했고 너무 쉬웠다.
그런데 너무 AWS 의존적이라는 생각이 들었고, 현재 내가 속한 상황에 몇 가지 맞지 않는 부분들이 있어서
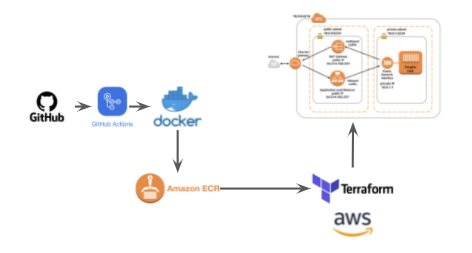
Test, docker build 등의 과정을 모두 Github actions를 사용하면 어떨까라는 생각이 들었다.
그래서 참고한 CICD 파이프라인의 모양은

이런 식이 된다.
2. Blue/Green Deployments with Amazon Elastic Container Service
AWS ECS 배포 방법을 선택하는 option에는 Rolling update와 Blue/Green deployment가 있다.

이 중 Blue/Green deployment방법을 사용하였으며 이 둘의 개념에 대해서 알아보았다.
배포 전략에 대한 더 자세한 내용은 https://poikilo.github.io/2020/03/03/deployment-strategy/ 와 https://reference-m1.tistory.com/211 글을 참고할 수 있다.
1) What are blue/green deployments?
“Blue” is the current running version of your application and “green” is the new version of your application you will deploy.
When you’re satisfied that the green version is working properly, you can gradually reroute the traffic from the old blue environment to the new green environment by modifying DNS.
2) ECS service 생성시 Deployments에서 Deployment type (Rolling update vs Blue / green)
- Rolling update: In this mode, the old and the new software version will coexist in the release phase. In fact, the new package will be installed progressively on all servers.
-

- Rolling Update는 한 Task씩 업데이트 되는 구조로 배포시 하나가 실행되면, 하나가 멈추고, 또 하나가 시행되면, 하나가 멈추며 전체 배포를 하는 형식
- Blue / green: Unlike the previous case, here it is possible to keep the old infrastructure (blue) while the new software version is installed in a new temporary infrastructure (green). Once this is installed, it is possible to carry out integration / validation tests on the new infrastructure to understand if we can actually promote the new software package. If so, the traffic switch can be done with virtually no downtime. The old infrastructure can be kept for a certain period of time to allow for any rollback operations, finally, it can be decommissioned.
-

- Blue/Green은 한번에 새로운 Task를 동시에 띄운 뒤 기존의 Task는 다 꺼버리는 방식. 예를 들어 4개의 기존 Task가 있다면 4개를 더 만들어 총 8개를 만든 뒤 기존 4개를 꺼버리는 방식(Code Deploy 설정이 필요)
이렇게 Blue/Green Deployment(powered by AWS CodeDeploy)를 선택하고 그렇게 service를 만들었다면 CodeDeploy > Applications 에 가보면 Application has been created together with a Deployment Configuration Group되어있다.

3. Registers an Amazon ECS task definition and deploys it to an ECS service with Github actions
AWS의 Codebuild, Codedeploy, Codepipeline을 사용한다면 이제 How to set up a Continuous Deployment Pipeline on AWS for ECS blue/green deployments 글을 참고하여 구축하면 되지만 나는 Github actions을 사용하여 Codebuild와 Codepipeline의 기능을 대신하여
- release branch에 PR이 merge되면
- 1. Login to Amazon ECR
- 2. docker build, tag, and push image to AWS ECR
- 3. Fill in the new image ID in the AWS ECS task definition
- 4. Blue Green Deploy AWS ECS task definition to service through CodeDeploy
- 될 수 있도록 하였다. (In short, from a simple git push, we want to release the new software package in Blue/Green mode through an ECS service.)
이를 위한 github action .yml을 작성하면 아래와 같이 되며, 자세한 예시는 aws-actions/amazon-ecs-deploy-task-definition: Registers an Amazon ECS task definition and deploys it to an ECS service. (github.com) 에 잘 나와있다.
name: Deploy to Amazon ECS

on:
    pull_request:
        branches: [release]
        types: [closed]

jobs:
    deploy:
        name: Deploy
        runs-on: ubuntu-latest

        steps:
            - name: Check out the repo
              uses: actions/checkout@v2

            - name: Configure AWS credentials
              uses: aws-actions/configure-aws-credentials@v1
              with:
                  aws-access-key-id: ${{ secrets.AWS_ACCESS_KEY_ID }}
                  aws-secret-access-key: ${{ secrets.AWS_SECRET_ACCESS_KEY }}
                  aws-region: ap-northeast-2

            # 1. Login to Amazon ECR
            - name: Login to Amazon ECR
              id: login-ecr
              uses: aws-actions/amazon-ecr-login@v1

            # 2. docker build, tag, and push image to AWS ECR
            - name: Build, tag, and push image to Amazon ECR
              id: build-image
              env:
                  ECR_REGISTRY: ${{ steps.login-ecr.outputs.registry }}
                  ECR_REPOSITORY: ${{ secrets.ECR_REPOSITORY }}
                  IMAGE_TAG: ${{ github.sha }}
              # Build a docker container and
              # push it to ECR so that it can be deployed to ECS.
              run: |
                  docker build -t $ECR_REGISTRY/$ECR_REPOSITORY:$IMAGE_TAG .
                  docker push $ECR_REGISTRY/$ECR_REPOSITORY:$IMAGE_TAG
                  echo "::set-output name=image::$ECR_REGISTRY/$ECR_REPOSITORY:$IMAGE_TAG"

             # 3. Fill in the new image ID in the AWS ECS task definition
            - name: Fill in the new image ID in the Amazon ECS task definition
              id: task-def
              uses: aws-actions/amazon-ecs-render-task-definition@v1
              with:
                  task-definition: task-definition.json
                  container-name: name
                  image: ${{ steps.build-image.outputs.image }}

            # 4. Blue Green Deploy AWS ECS task definition to service through CodeDeploy
            - name: Deploy Amazon ECS task definition
              uses: aws-actions/amazon-ecs-deploy-task-definition@v1
              with:
                  task-definition: ${{ steps.task-def.outputs.task-definition }}
                  service: ${{ secrets.ECS_SERVICE_NAME }}
                  cluster:  ${{ secrets.ECS_CLUSTER_NAME }}
                  wait-for-service-stability: true
                  # AWS CodeDeploy Support: For ECS services that uses the CODE_DEPLOY deployment controller, additional configuration is needed for this action
                  # REFERENCE: https://github.com/aws-actions/amazon-ecs-deploy-task-definition#aws-codedeploy-support
                  codedeploy-appspec: appspec.yaml
                  codedeploy-application: ${{ secrets.CODEDEPLOY_APPLICATION }}
                  codedeploy-deployment-group: ${{ secrets.CODEDEPLOY_DEPLOYMENT_GROUP }}
그리고 여기서 사용되는 task-definition.json은
{
    "executionRoleArn": "arn:aws:iam::account_ID:role/ecsTaskExecutionRole",
    "containerDefinitions": [
        {
            "name": "sample-website",
            "image": "<IMAGE1_NAME>",
            "essential": true,
            "portMappings": [
                {
                    "hostPort": 80,
                    "protocol": "tcp",
                    "containerPort": 80
                }
            ]
        }
    ],
    "requiresCompatibilities": [
        "FARGATE"
    ],
    "networkMode": "awsvpc",
    "cpu": "256",
    "memory": "512",
    "family": "ecs-demo"
}
이렇게,
codedeploy의 appspec.yml은
version: 0.0
Resources:
  - TargetService:
      Type: AWS::ECS::Service
      Properties:
        TaskDefinition: "task-definition-ARN"
        LoadBalancerInfo:
          ContainerName: "container-name"
          ContainerPort: container-port-number
# Optional properties
        PlatformVersion: "LATEST"
        NetworkConfiguration:
            AwsvpcConfiguration:
              Subnets: ["subnet-name-1", "subnet-name-2"]
              SecurityGroups: ["security-group"]
              AssignPublicIp: "ENABLED"
Hooks:
- BeforeInstall: "BeforeInstallHookFunctionName"
- AfterInstall: "AfterInstallHookFunctionName"
- AfterAllowTestTraffic: "AfterAllowTestTrafficHookFunctionName"
- BeforeAllowTraffic: "BeforeAllowTrafficHookFunctionName"
- AfterAllowTraffic: "AfterAllowTrafficHookFunctionName"
이런식으로 작성해주면 된다.
이에 대한 설명은 Tutorial: Create a pipeline with an Amazon ECR source and ECS-to-CodeDeploy deployment - AWS CodePipeline 을 참고하였다.
이렇게 파이프라인을 구축하주고나면 dev branch에서 release branch로 날라온 PR이 머지되면 Github에서 자동으로 이 과정이 이루어지고,

Codedeploy에서 Blue/Green 배포가 진행되고 있는 것을 확인할 수 있다.

그리고 ECS의 task에 가보면 old task(blue)와 new temporary task (green)가 함께 돌아가고 있다가, the traffic switch can be done with virtually no downtime된면서 new task만 남으며, 변경 사항이 잘 반영되어 있는 것을 확인할 수 있다. (무중단 배포)
(The old infrastructure can be kept for a certain period of time to allow for any rollback operations, finally, it can be decommissioned.)
Github actions으로 충분히 필요한 기능을 할 수 있었고, 그걸 구축해보아서 좋은 경험이었다.
Reference
[Github actions]
GitHub Actions 깃허브 액션 기능 배워보기 (tistory.com)
[Blue/Green deployments]
Blue/Green Deployments with Amazon Elastic Container Service
ECS deployment strategies: reduce downtime and risk with blue/green deployment
[Blue/Green deployments with AWS codepipeline]
ECS deployment strategies: reduce downtime and risk with blue/green deployment.
[Blue/Green deployments with Github actions and codedeploy]
https://github.com/aws-actions/amazon-ecs-deploy-task-definition#aws-codedeploy-supporthttps://github.com/shgtkshruch/ecs-blue-green-deploy-sample
[그 외 pipeline]
1. Build a Serverless CI/CD pipeline on AWS with Fargate, CodePipeline and Terraform✅

2. 위에서 Code Build 대신 Github Actions 사용 (How to deploy using AWS CodeDeploy with GitHub Actions) ✅

3. DevOps – CI/CD with Github, Jenkins, and Amazon Web Services

'Dev > DevOps, Infra' 카테고리의 다른 글
| [Github, CI/CD] 특정 파일이나 폴더에 대해서만 Github Actions가 trigger되는 방법 (1) | 2021.08.09 |
|---|---|
| [HTTP, AWS] 3xx 대 Status와 Lambda@Edge (0) | 2021.06.24 |
| [DevOps] AWS CodePipeline을 이용한 ECS Fargate 배포하기 (0) | 2021.05.15 |
| [(IaC)Terraform] Terraform Variables 활용하기 (0) | 2021.05.10 |
| [(IaC)Terraform] Terraform Backend 활용하기 (0) | 2021.05.09 |